Overview
Use the Monitoring Visit workspace to monitor report activity, execute report workflows, and complete role-based handoff from site monitor to sponsor approval.
Path: Study Workspace → Monitoring Visit
Dashboard URL pattern: https://[instance]/study/[studyId]/apps/monitoring/dashboard
Live sample used in this guide: https://test-2025.clinicaldatas.net/study/S_Z0wtgjApA3j3u4jSKF/apps/monitoring/dashboard
Configuration sample for the same study: https://test-2025.clinicaldatas.net/home/study/S_Z0wtgjApA3j3u4jSKF/apps/monitoring
Accounts Used for Validation
| Workflow Scope | Account |
|---|---|
| Monitoring operations (site scope) | site01_monitor, site02_monitor |
| Review transitions | site01_reviewer |
| Sponsor approval | study_sponsor |
| Configuration owner | study_admin |
Screen-by-Screen Navigation Map
Use this map to train users in the same sequence used for documentation validation.
- Configuration (Home workspace)
- URL: /home/study/[studyId]/apps/monitoring
- Purpose: Set visit types, CRF mapping, recipients, and site branches.
- Dashboard (Study workspace)
- URL: /study/[studyId]/apps/monitoring/dashboard
- Purpose: Monitor visit activity and issues across sites.
- Reports list
- URL: /study/[siteOid]/apps/monitoring/reports?...
- Purpose: Search/filter/export report records and open report detail.
- Report detail
- URL: /study/[studyId]/apps/monitoring/reports/[visitOid]/detail/[cvOid]
- Purpose: Complete report content, add comments/issues/reviews, move status.
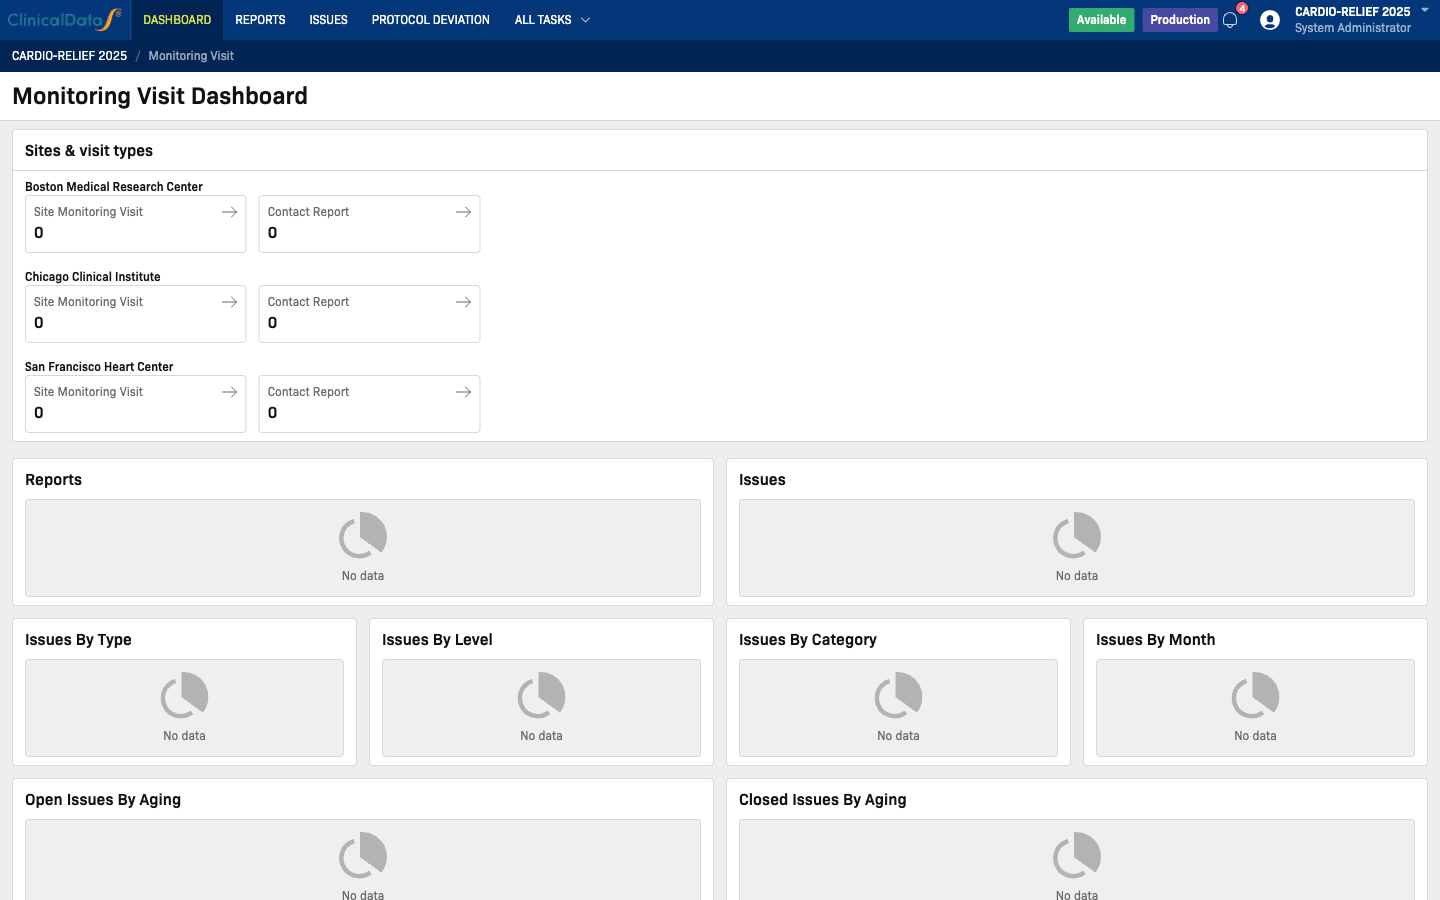
Step 1: Start from Monitoring Visit Dashboard
Recommended account: site01_monitor (repeat with site02_monitor for cross-site validation)
The dashboard gives a cross-site monitoring view with two main zones:
- Sites & visit types panel
- Analytics widgets for reports and issues

Sites & Visit Types Panel
For each site, the dashboard shows visit type counters (for example: Site Monitoring Visit, Contact Report).
Click a counter to open the Reports list pre-filtered by:
- Selected visit type
- Selected site
This is the fastest way to jump from summary metrics to actionable report records.
Analytics Widgets
The dashboard includes high-level widgets such as:
- Reports
- Issues
- Issues By Type
- Issues By Level
- Issues By Category
- Issues By Month
- Open Issues By Aging
- Closed Issues By Aging
If no reports/issues exist yet, widgets show a No data state.
What This Screen Is Used For
- Operational triage by site and visit type
- Quick detection of pending monitoring work
- Trend review of issue volume and closure behavior
Expected result:
- You can navigate from summary counters to report lists in one click.
Step 2: Work with Reports List
When you open a visit counter from dashboard, the Reports page opens with pre-applied filters.
URL pattern:
https://[instance]/study/[siteOid]/apps/monitoring/reports?visitType=[visitType]&siteOid=[siteOid]
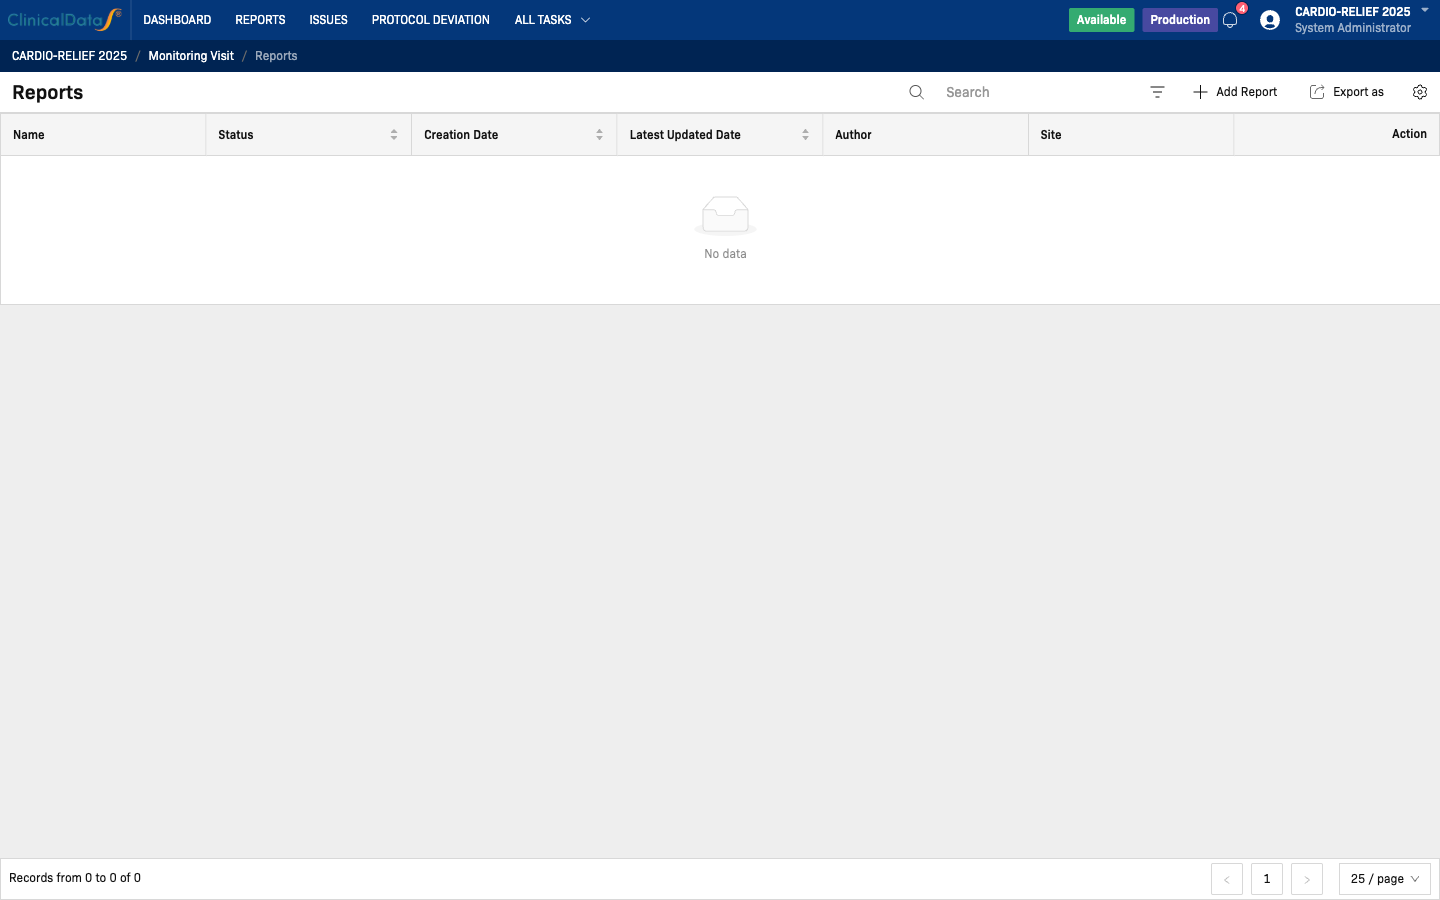
Available Actions
- Search reports by keyword
- Filter chips for Visit type and Site
- Refresh report list
- Export as for CSV/Excel output
- View to open report detail
- Download to export one report as PDF
Understand Core Columns
- Name - Report label/identifier
- Status - Draft, Completed, Reviewed, Finalized, Approved
- Creation Date / Latest Updated Date - Audit timeline
- Author - Report owner
- Site - Site owning the report
Export Reports
- Click Export as.
- Enter File name.
- Choose Export type:
Current pageorAll pages. - Choose File format:
CSVorExcel. - Click Export.
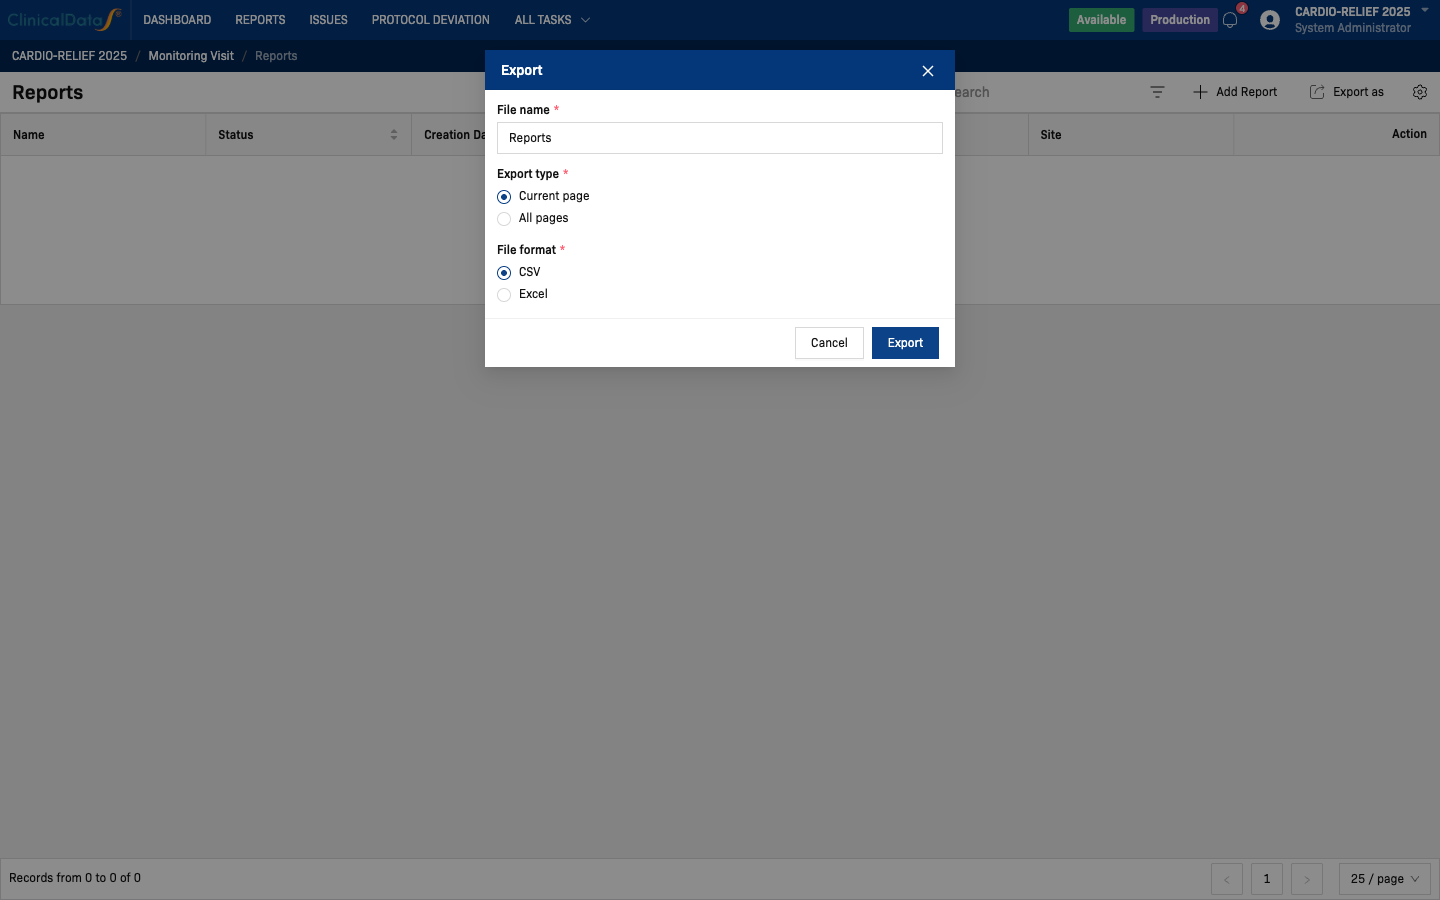
Expected result:
- Filter chips, export options, and report detail navigation all function for monitor users.
Step 3: Create a New Report
Recommended account: site01_monitor
- Open Reports from Monitoring Visit.
- Click Add Report.
- Select Site and Visit type.
- Click Continue.
- The system creates a new report in Draft and opens Report detail.
Behind the scenes, the create flow checks:
- Visit type is active and can create new report
- CRF version is configured for selected visit type
- Initial site/study metadata is loaded (study title, sponsor, protocol, investigator, site info)
Expected result:
- New report is created in Draft and available for section-level updates.
Step 4: Complete Report Detail
In Report detail, users typically perform:
- Fill CRF fields for the monitoring visit.
- Add contextual Comment, Issue, or Review per section.
- Attach supporting files (if needed).
- Save progress in Draft during data entry.
Use section-level add actions to keep findings linked to the exact division/section in the report.
Expected result:
- Report contains complete draft data and supporting evidence for review.
Step 5: Execute Status Workflow (Draft to Approved)
The module supports this report lifecycle:
Draft -> Completed -> Reviewed -> Finalized -> Approved
Meaning of Each Status
- Draft
- Working state for authoring and updates.
- Content may still be incomplete.
- Completed
- Report content is complete and ready for reviewer assessment.
- Reviewed
- Reviewer completed scientific/operational review.
- Finalized
- Final review package is locked for sponsor-level approval flow.
- Approved
- Sponsor/authorized approver accepted the finalized report.
Transition Actions in Report Detail
- From Completed (account: site01_reviewer): Set as Reviewed
- From Reviewed (account: site01_reviewer): Set as Finalized
- From Finalized (account: study_sponsor): Set as Approved
- Reject path from review stages: Reject (returns report to
Draft)
Each status change opens a Note modal. Enter the rationale to maintain a clear audit trail.
How to Explain "Send to Sponsor"
In operations, teams usually treat:
- Set as Finalized = report package is prepared for sponsor decision
- Set as Approved = sponsor-side approval is completed
If your SOP uses a separate terminology (for example "Submitted to Sponsor"), map that SOP term to the above status transitions in your training materials.
Step 6: Validate Settings That Affect Daily Use
Configuration choices directly impact report lifecycle and notifications.
Recipient Notification Settings
In Configuration -> Visit Configuration -> Edit:
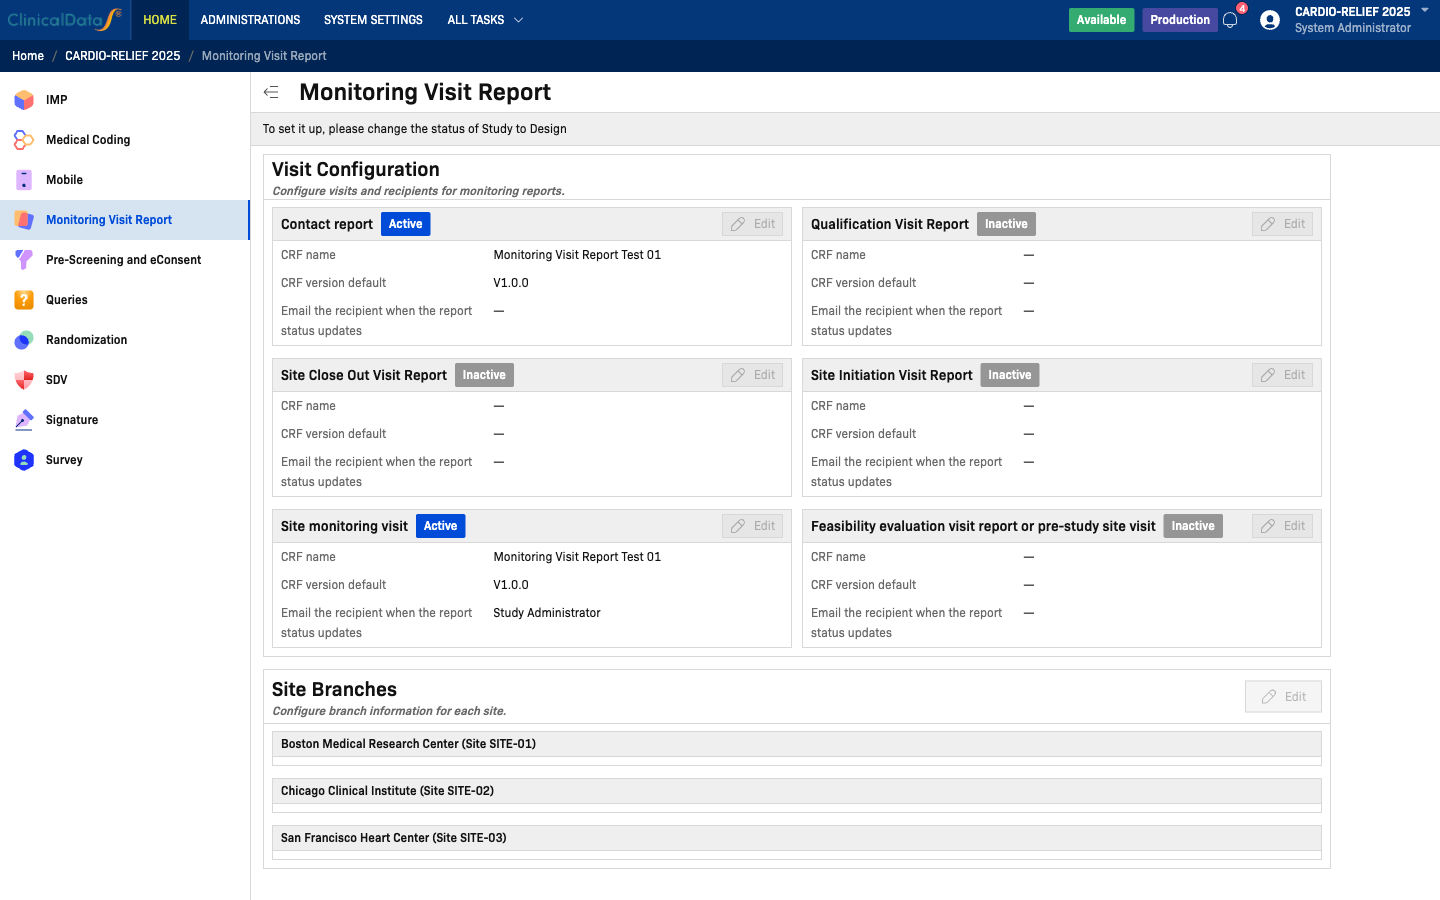
- Email the recipient when the report status updates allows role-based recipients (Study Administrator, Study Sponsor, Reviewer, etc.).
- Specific People can be enabled for ad-hoc recipients.
- Enter specific emails separated by semicolon (
;).
Use this to notify sponsor-facing roles when reports move from Reviewed/Finalized/Approved.
Visit-Type CRF Mapping
Each active visit type must have:
- CRF name
- CRF version default
Without CRF version mapping, users cannot create new reports for that visit type.
Site Branch Setup
If branches are used in monitoring operations, keep Site Branches current so location/contact context is correct in report workflows.
Permissions and View-Only Mode
In view-only studies, a warning banner appears:
"This is a view only study. You cannot make any updates to it."
In this mode, users can still review dashboard metrics, search/filter reports, and export data, but cannot create or edit records.
For full end-to-end training (create, edit, transition status), use a study where your role has non-view-only permissions.
Suggested Daily Workflow (CRA / Monitor)
- Open Monitoring Visit Dashboard.
- Review site counters under Sites & visit types.
- Open high-priority site/visit combinations.
- Create or update reports and keep drafts current.
- Move reports through review states with note-based audit comments.
- Notify sponsor-facing stakeholders via configured email recipients.
- Export report snapshots when sharing progress with stakeholders.
- Return to dashboard to monitor overall issue trends.
End-to-End Execution Runbook (Using Sample Accounts)
- Login as study_admin and confirm visit configuration is complete.
- Login as site01_monitor and create one new report in Draft.
- Complete report content and mark as Completed.
- Login as site01_reviewer and set report to Reviewed, then Finalized.
- Login as study_sponsor and set report to Approved.
- Login as site02_monitor and validate site-scoped list visibility and counters.
- Export CSV/Excel and one PDF from reports list/detail.